

Security Onion: Your Guardian Against Digital Threats
In the ever-evolving landscape of cybersecurity, a resilient defense strategy is essential. Enter Security Onion, a powerful open-source solution designed to be your vigilant sentinel, safeguarding your network from potential threats and vulnerabilities. In this post, we’re going to delve into what exactly Security Onion is and why it’s an indispensable asset in your cybersecurity arsenal.
Unveiling the Guardian: What is Security Onion? Imagine having a watchful guardian that tirelessly monitors your network, analyzing traffic for signs of intrusion and anomalies. That’s exactly what Security Onion brings to the table. It’s a comprehensive platform that combines various tools and technologies to provide network security monitoring (NSM) and intrusion detection capabilities.
Key Features and Components:
Network Security Monitoring (NSM): Security Onion excels in real-time monitoring of network traffic. It captures, indexes, and stores network packets, enabling you to analyze them for signs of malicious activity.
Intrusion Detection: By analyzing network traffic patterns, Security Onion can detect and alert you to potential security breaches, suspicious behaviors, and known attack signatures.
Packet Capture and Analysis: It captures complete network packets, allowing you to conduct detailed analysis and investigation when security incidents occur.
Visualization and Reporting: Security Onion offers visualization tools to help you make sense of complex network data. It also generates reports that aid in communicating security insights to stakeholders.
Integration of Open-Source Tools: Security Onion leverages various open-source projects like Suricata, Zeek, and ELK (Elasticsearch, Logstash, and Kibana) to create a robust and flexible security monitoring platform.
Why Choose Security Onion?
Powerful Defense: With Security Onion, you gain the upper hand in identifying and mitigating potential threats, enhancing your network’s resilience.
Customizability: The platform can be tailored to suit your network’s specific needs, ensuring effective threat detection aligned with your environment.
Scalability: Whether you’re a small business or a large enterprise, Security Onion can be scaled to fit your network size and demands.
Community Support: Being open-source, Security Onion benefits from a dedicated community of users and contributors, ensuring continuous improvement and updates.
Ready to Embrace Security Onion? Security Onion is your digital guardian, tirelessly standing watch over your network. In our this post, I will guide you through the process of installing and configuring Security Onion, equipping you to fortify your network’s defenses. Stay tuned and embark on a journey toward enhanced cybersecurity.
Defend your digital realm, Arsenio Brown
Lets get into it.
Download Security Onion ISO File here
- In Vmware Home Select
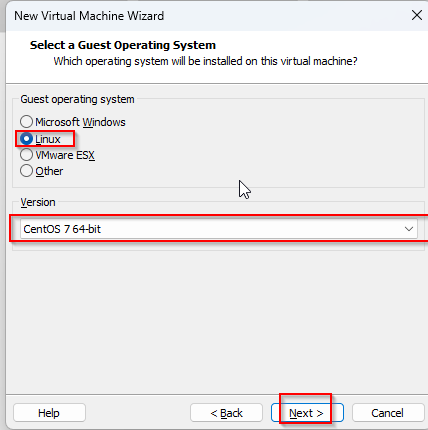
Create a New Virtual Machinethen SelectTypical (recommended)then ClickNextthen Browse to the Security Onion ISO. - For Guest OS Choose Linux and CentOS 7 64-Bit then Click
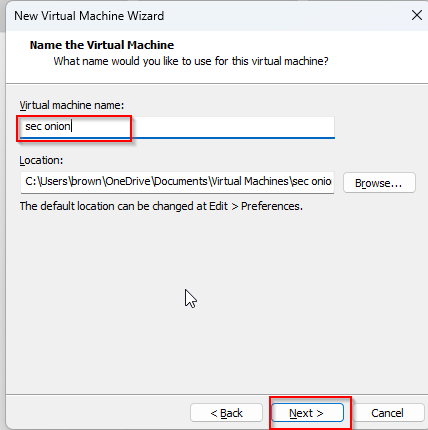
Next - Specify the VM Name
Sec Onionthen clickNext - Specify Desk Size
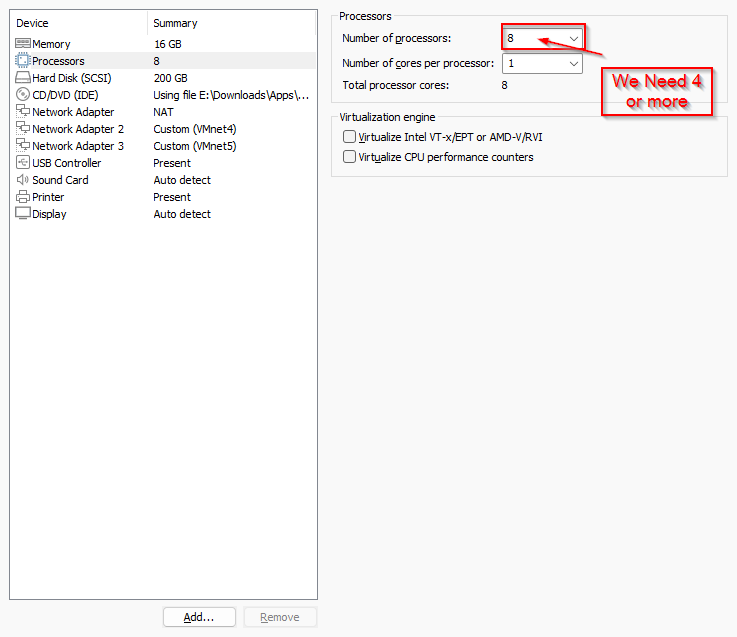
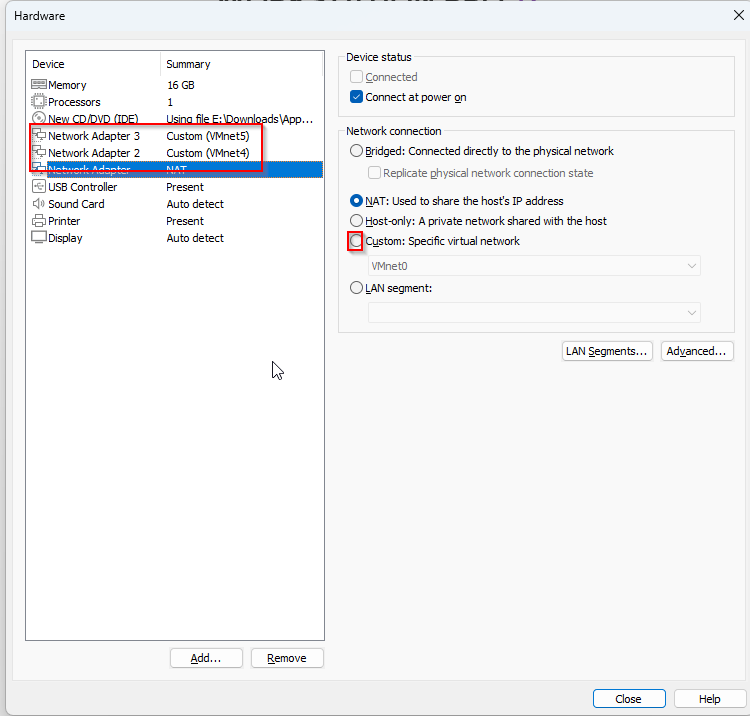
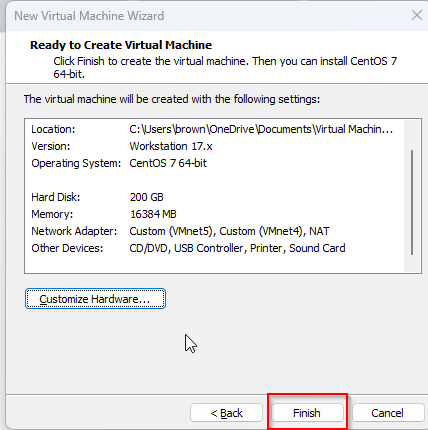
Mininmum 20GBstore as single file, clickNext - click
Customize Hardwareadd two new network adaptors Assign them Vmnet4 & Vmnet5 and change the memory to4-32GBThen clickFinish![2023-08-13 21_05_03-VMware Workstation.png]()
![2023-08-13 21_10_36-New Virtual Machine Wizard.png]()
![2023-08-13 21_11_47-New Virtual Machine Wizard.png]()
![2023-08-13 21_12_41-New Virtual Machine Wizard.png]()
![2023-08-14 13_39_39-Virtual Machine Settings.png]()
![2023-08-13 21_15_00-Hardware.png]()
![2023-08-13 21_17_32-New Virtual Machine Wizard.png]()
- Start the virtual machine and press the
Enterkey when prompted. - You should see this screen
![securityonionpic.jpg]()
- Do you wish to continue? Type
yes - Enter an administrator username
input-your-usernameand set a passwordyourpassword![[sec onion-2023-08-14-13-30-00.png]]()
- Select the standard installation option
![[sec onion-2023-08-14-13-32-33.png]]()
- Select Eval
![[sec onion-2023-08-14-13-34-13.png]]()
- Type
AGREE![[sec onion-2023-08-14-13-36-10.png]]()
- Change the name to
securityonionlaborsec lab![[2023-08-14 13_51_40-.png]]()
- Select the first interface
![[2023-08-14 13_54_17-.png]]()
- Select DCHP then select
yesthenok


![[sec onion-2023-08-14-13-30-00.png]](/assets/images/Projects/Threathuntinglab/securityonion/sec%20onion-2023-08-14-13-30-00.png)
![[sec onion-2023-08-14-13-32-33.png]](/assets/images/Projects/Threathuntinglab/securityonion/sec%20onion-2023-08-14-13-32-33.png)
![[sec onion-2023-08-14-13-34-13.png]](/assets/images/Projects/Threathuntinglab/securityonion/sec%20onion-2023-08-14-13-34-13.png)
![[sec onion-2023-08-14-13-36-10.png]](/assets/images/Projects/Threathuntinglab/securityonion/sec%20onion-2023-08-14-13-36-10.png)
![[2023-08-14 13_51_40-.png]](/assets/images/Projects/Threathuntinglab/securityonion/2023-08-14%2013_51_40-.png)
![[2023-08-14 13_54_17-.png]](/assets/images/Projects/Threathuntinglab/securityonion/2023-08-14%2013_54_17-.png)
![[2023-08-14 13_56_06-.png]](/assets/images/Projects/Threathuntinglab/securityonion/2023-08-14%2013_56_06-.png)
- How should this manager be installed
Standard![[Pasted image 20230814140301.png]]()
- Select Direct
![[2023-08-14 14_04_19-sec onion - VMware Workstation.png]]()
You Will see a loading screen then select
The last interface for the monitor interface![[2023-08-14 14_05_57-sec onion - VMware Workstation.png]]()
![[2023-08-14 14_08_59-sec onion - VMware Workstation.png]]()
![[2023-08-14 14_09_42-sec onion - VMware Workstation.png]]()
- Press
Enter![[2023-08-14 14_09_58-sec onion - VMware Workstation.png]]()
![[2023-08-14 14_10_29-sec onion - VMware Workstation.png]]()
![[Pasted image 20230814140301.png]](/assets/images/Projects/Threathuntinglab/securityonion/2023-08-14%2013_59_19-.png)
![[2023-08-14 14_04_19-sec onion - VMware Workstation.png]](/assets/images/Projects/Threathuntinglab/securityonion/2023-08-14%2014_04_19-sec%20onion%20-%20VMware%20Workstation.png)
![[2023-08-14 14_05_57-sec onion - VMware Workstation.png]](/assets/images/Projects/Threathuntinglab/securityonion/2023-08-14%2014_05_57-sec%20onion%20-%20VMware%20Workstation.png)
![[2023-08-14 14_08_59-sec onion - VMware Workstation.png]](/assets/images/Projects/Threathuntinglab/securityonion/2023-08-14%2014_08_59-sec%20onion%20-%20VMware%20Workstation.png)
![[2023-08-14 14_09_42-sec onion - VMware Workstation.png]](/assets/images/Projects/Threathuntinglab/securityonion/2023-08-14%2014_09_42-sec%20onion%20-%20VMware%20Workstation.png)
![[2023-08-14 14_09_58-sec onion - VMware Workstation.png]](/assets/images/Projects/Threathuntinglab/securityonion/2023-08-14%2014_09_58-sec%20onion%20-%20VMware%20Workstation.png)
![[2023-08-14 14_10_29-sec onion - VMware Workstation.png]](/assets/images/Projects/Threathuntinglab/securityonion/2023-08-14%2014_10_29-sec%20onion%20-%20VMware%20Workstation.png)
![[2023-08-14 14_10_52-sec onion - VMware Workstation.png]](/assets/images/Projects/Threathuntinglab/securityonion/2023-08-14%2014_10_52-sec%20onion%20-%20VMware%20Workstation.png)
- enter a
email![[2023-08-14 14_11_20-sec onion - VMware Workstation.png]]()
![[2023-08-14 14_13_04-sec onion - VMware Workstation.png]]()
![[2023-08-14 14_13_16-sec onion - VMware Workstation.png]]() Select no for so-allow we will use this later
Select no for so-allow we will use this later ![[2023-08-14 14_13_41-sec onion - VMware Workstation.png]]()
- Take note of the Access URL
![[2023-08-14 16_40_37-SecOnion - VMware Workstation.png]]()
![[2023-08-14 14_11_20-sec onion - VMware Workstation.png]](/assets/images/Projects/Threathuntinglab/securityonion/2023-08-14%2014_11_20-sec%20onion%20-%20VMware%20Workstation.png)
![[2023-08-14 14_13_04-sec onion - VMware Workstation.png]](/assets/images/Projects/Threathuntinglab/securityonion/2023-08-14%2014_13_04-sec%20onion%20-%20VMware%20Workstation.png)
![[2023-08-14 14_13_41-sec onion - VMware Workstation.png]](/assets/images/Projects/Threathuntinglab/securityonion/2023-08-14%2014_13_41-sec%20onion%20-%20VMware%20Workstation.png)
![[2023-08-14 16_40_37-SecOnion - VMware Workstation.png]](/assets/images/Projects/Threathuntinglab/securityonion/2023-08-14%2016_40_37-SecOnion%20-%20VMware%20Workstation.png)
![[2023-08-14 14_15_16-sec onion - VMware Workstation.png]](/assets/images/Projects/Threathuntinglab/securityonion/2023-08-14%2014_15_16-sec%20onion%20-%20VMware%20Workstation.png)
Installing Security Onion Management
Install Ubuntu desktop here
- Follow the steps on your screen and keep the defaults settings. name the machine
SecOnionMgmt - Open a terminal and and type
sudo apt install net-toolsso you can useipconfigorip ato find the IP of the Ubuntu VM![[2023-08-14 17_30_44-SecOnionMgmt - VMware Workstation.png]]()
![[2023-08-14 17_31_50-SecOnionMgmt - VMware Workstation.png]]()
- Go back to Security Onion and type
sudo so-allowselect optionaand typeyour-ip- of the ubunut vm![[2023-08-14 17_34_47-SecOnion - VMware Workstation.png]]()
- Now head back to
SecOnionMgmtorUbuntuand open Firefox and typeIP-address of security onion managementand enter in the username and password form the installation.![[2023-08-14 17_37_15-SecOnionMgmt - VMware Workstation.png]]()
![[2023-08-14 17_37_46-SecOnionMgmt - VMware Workstation.png]]()
![[2023-08-14 17_53_56-SecOnionMgmt - VMware Workstation.png]]() The completion of this lab segment marks the end of our current task. Take the opportunity to explore Security Onion’s user interface and become acquainted with its features. If you have any questions or need further assistance, don’t hesitate to ask. Happy exploring!
The completion of this lab segment marks the end of our current task. Take the opportunity to explore Security Onion’s user interface and become acquainted with its features. If you have any questions or need further assistance, don’t hesitate to ask. Happy exploring!
![[2023-08-14 17_30_44-SecOnionMgmt - VMware Workstation.png]](/assets/images/Projects/Threathuntinglab/securityonion/2023-08-14%2017_30_44-SecOnionMgmt%20-%20VMware%20Workstation.png)
![[2023-08-14 17_31_50-SecOnionMgmt - VMware Workstation.png]](/assets/images/Projects/Threathuntinglab/securityonion/2023-08-14%2017_31_50-SecOnionMgmt%20-%20VMware%20Workstation.png)
![[2023-08-14 17_34_47-SecOnion - VMware Workstation.png]](/assets/images/Projects/Threathuntinglab/securityonion/2023-08-14%2017_34_47-SecOnion%20-%20VMware%20Workstation.png)
![[2023-08-14 17_37_15-SecOnionMgmt - VMware Workstation.png]](/assets/images/Projects/Threathuntinglab/securityonion/2023-08-14%2017_37_15-SecOnionMgmt%20-%20VMware%20Workstation.png)
![[2023-08-14 17_37_46-SecOnionMgmt - VMware Workstation.png]](/assets/images/Projects/Threathuntinglab/securityonion/2023-08-14%2017_37_46-SecOnionMgmt%20-%20VMware%20Workstation.png)
![[2023-08-14 17_53_56-SecOnionMgmt - VMware Workstation.png]](/assets/images/Projects/Threathuntinglab/securityonion/2023-08-14%2017_53_56-SecOnionMgmt%20-%20VMware%20Workstation.png)